
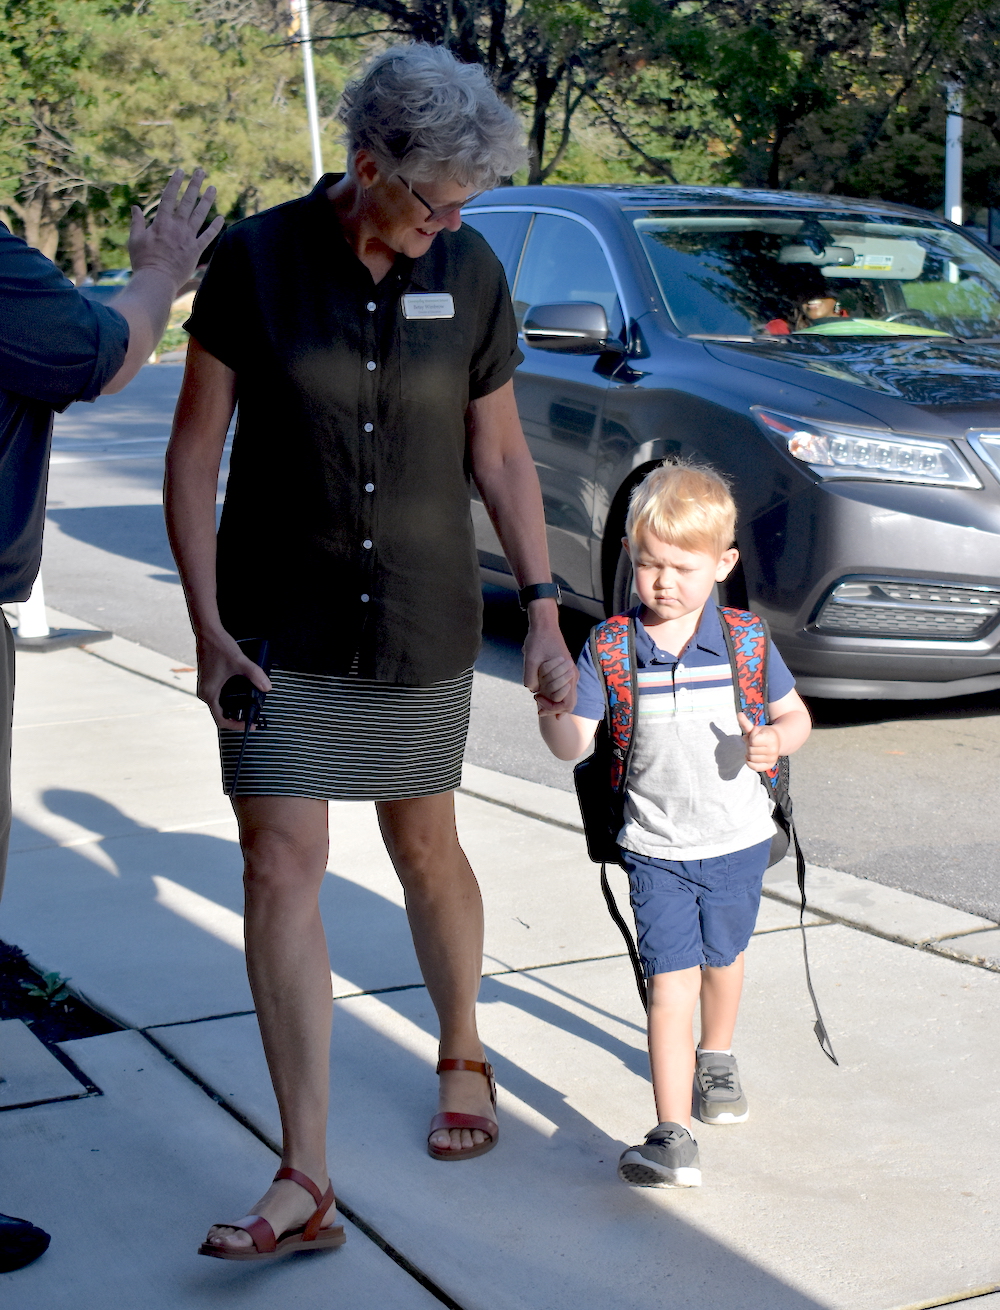
Beginning a new school year is a time of excitement and uncertainty for many new children. For some, it is their first time being away from home for a stretch of time. It is common for students (and parents) to experience feelings of anxiety; this is perfectly normal. These feelings are often caused by a fear of the unknown, as the child has no point of reference to draw upon when faced with a new environment or experience.
Separation anxiety can also be attributed to a child’s stage of development. Separation anxiety is a normal part of development, and most common for children aged eight months to two years; however, it can affect children of all ages. The first day of school, in a new room or level, can bring on a reoccurrence of separation anxiety in children who were previously settled. It takes time for young children to build relationships and establish a sense of trust with their new guides, so that they come to understand that their new environment is a safe and happy place. This is not uncommon, and is likely to settle once a new routine and relationships have been established.


Below you will find a number of strategies published by the Montessori Academy to help Montessori parents settle their children into preschool. Remember separation anxiety is a phase, it is perfectly normal, and will pass in time.
Positive Behaviors and Attitudes
Modeling positive behaviors and attitudes plays an important role in the success of the first day of school, and the weeks thereafter. Keep discussions about school positive, and focus on things that your child is likely to enjoy. Children pick up on parent’s feelings, behaviors, and emotions, and are likely to emulate them if you are feeling upset or uncertain.
Morning Routines
Establish a positive and happy morning routine for preschool days. For children over two, this may include encouraging your child to pack their own school bag or sing a happy ‘school day’ themed song. Always give yourself plenty of time to get ready and arrive on time. Feeling late or rushed can cause children to feel additional anxiety.
Acknowledge your Child’s Feelings
It is important to accept that your child’s unhappiness at being separated from you is real, very normal, and temporary. Reinforce that you understand that leaving your child makes them unhappy, but that it is important that you leave, and they will have a good time. Avoid offering your child bribes for good behavior or not crying as this is only a temporary solution. Learning to cope with sadness is an important part of your child’s development and learning about emotions.
Positive and Prompt Goodbyes
When you drop your child off, don’t linger outside the classroom or stay for “just one more minute.” As a parent, the best thing you can do is give your child a hug and a kiss as they get out of the car, let them know you love them, and reassure them that you will be back soon. It is important for your child that you do not delay the inevitable.
Establish a Goodbye Routine
Montessori parents who establish a consistent goodbye routine typically have better luck with successful goodbyes. Take a special moment with your child to say goodbye, and do it the same way, every day. This may be as simple as a kiss and a cuddle, giving your child a thumbs up, or establishing a ‘secret’ hand shake. A special goodbye is a great way for your child to start their day feeling happy and reassured.
Encourage Friendships
Make a point of getting to know your child’s friends and classmates at school, and encourage friendships outside of school. These friendships will help make your child’s transition to the new Montessori environment easier.
Pick Up Routines
It is important to be punctual when picking up your child. It easy to lose track of time, but no matter who is picking your child up, always be on time. If you are late, it can cause your child to feel more anxiety, and makes drop off the next time much harder.
Positive Daily Reflections
On the way home, establish a routine where you talk to your child about their school day. Focus on the positive aspects of their day, such as their favorite activity, or playing with their best friend. By consistently reinforcing the positive aspects of their school day, your child will learn that their new environment is a fun and happy place, and their feelings of anxiety will decrease over time.

“A child who becomes a master of his acts through repeated exercises [of grace and courtesy]…is a child filled with health and joy and remarkable for his calmness and discipline.” – Dr. Maria Montessori
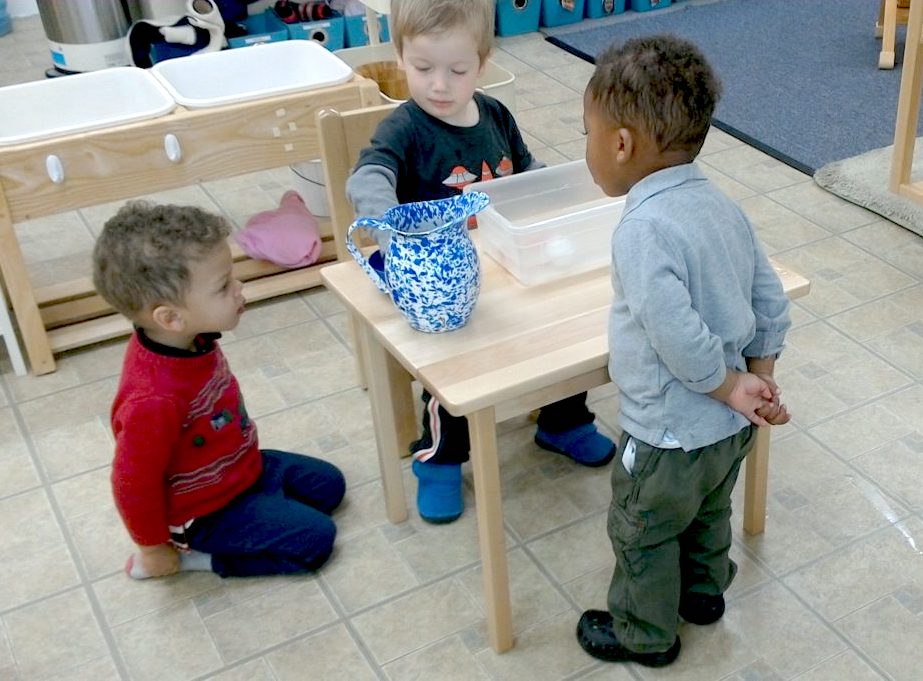
Have you ever entered a Montessori classroom and noticed that the children are naturally respectful of each other and often helpful? An older child may help a younger child zip his jacket zipper. A child might accidentally spill beans on the floor and two children stop what they are doing to help her clean up. Two students having a disagreement decide to go over to the peace table to work it out. These are manifestations of tGrace and Courtesy in the Montessori classroom, which is built upon 1) treating the child with respect, 2) teaching the child to respect herself, 3) teaching the child to treat others with respect, and 4) teaching the child to treat her environment with respect. Grace and Courtesy remains a focus at every level of Montessori education.
When we respect a young learner’s dignity by teaching the basic rules of etiquette, it fills a need in them. Dr. Montessori once taught a small group of children how to politely blow their noses; she explained every step in detail and showed them how to do it quietly and respectfully. After this presentation, the children erupted into spontaneous applause. They were delighted to know how to do something, that to adults would seem so basic. However, to these young learners, their teacher had shown them something they were longing to know how to do.
What does this look like in our classrooms? Treating the child with respect means that we speak to the children with soft voices and at eye level. We give the children freedom to choose their work and decide where they want to work. Yet the guidelines and limits of the environment are understood by all. For example, a lesson should be put back where it came from before moving on to something new. Children are free to choose their work, but are not free to disturb the work of others. We call this “freedom with responsibility.”
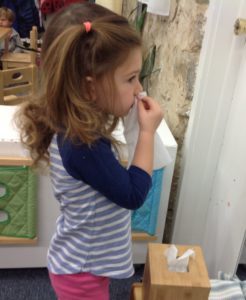
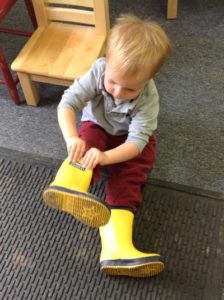

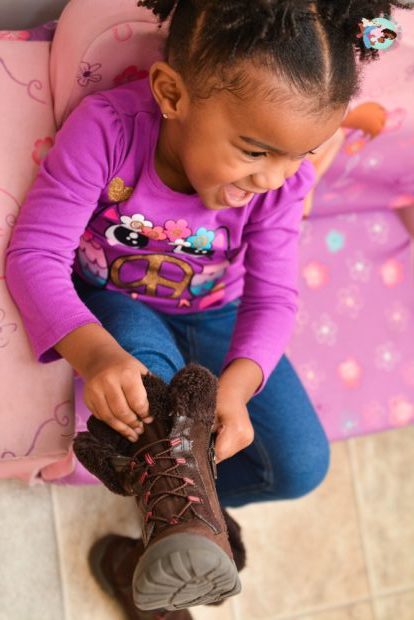
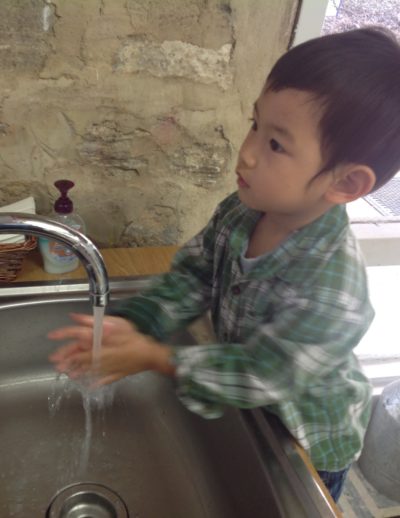
There are specific Grace and Courtesy lessons that demonstrate how to respect and care for oneself, such as blowing one’s nose, washing hands, getting in and out of a chair, putting on shoes, hanging up or putting on a jacket, etc.


Lessons on respecting others include how to greet a visitor, walking around a rug, how to ask for help, using soft voices, inviting others to work, how to solve a conflict with a classmate, etc.


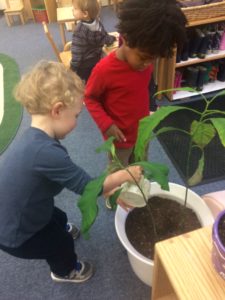
Lessons on respecting the environment include carrying and rolling up a rug, setting the table, how to take materials off of shelves, washing a plant, washing a table or mirror, etc. We are working daily on cultivating a sense of gratitude and nurturing wonder.
One of the main goals of a Montessori education is to prepare students to be contributing and valued members of society. This starts with lessons of Grace and Courtesy, which are key to modeling peace, learning how to act in social situations, showing respect for each other. These are tools our children will use their entire lives!
“Never help a child at a task which he feels can succeed.” -Dr. Maria Montessori
If you are lucky, your family members – especially those proud grandparents! – are excited and eager to learn more about your child’s Montessori journey. While we can’t expect our extended family to completely rearrange their homes or lifestyles, there are some simple ways that they can support your child in building independence.
Simple ways for family members to help your child’s growing independence
Allow the child to make decisions with limited choices
You can allow a child opportunities to make decisions without giving up all control. Consider offering two choices – both of which you are happy with. “Would you like a grilled cheese sandwich or chicken noodle soup for lunch?”
Allow the child to do things for herself
It is the natural instinct of a loving family member to make life “easier” for a child. But when we take away opportunities to overcome worthy challenges, we inhibit them from learning new skills and building self-esteem. For example, it may take much longer for a young child to zip up her own coat, but when time allows, give her the opportunity to try. If she begins to get frustrated, provide the minimal amount of help needed (such as holding the bottom of the coat to create tension, while the child pulls up the zipper).
Prepare the environment for independence
Allowing a child to do things for herself may require some support. Consider providing a stool at the bathroom sink so the child can reach the faucet to wash her hands. Consider putting out a small pitcher of water and a small glass so she can help herself when she is thirsty. If dishes, napkins, and silverware are placed in a lower cabinet, the child can help set the table for a meal.

Involve the child in activities of daily life
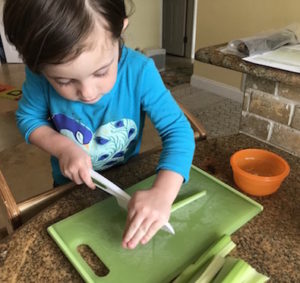
Not every visit with Grandma and Grandpa needs to involve a trip to the zoo. Children want to do what you do! Invite them to join you peeling vegetables, feeding pets, watering the flowers, etc. You may need to provide child-size tools for some of these activities, such as a small watering can or acrylic knife, so that your child can participate fully.
Create order in the environment
Instead of piling toys in a basket, consider setting up a small open bookshelf where only a few toys are accessible. This helps the child make independent choices and give more focused attention to the chosen activity. (Toys can be rotated in and out to keep the child’s interest.) A minimal, organized toy area will also help the child clean up independently because there is a clear place for everything.
Be careful of praise
Dr. Montessori found that praise can inhibit children from gaining independence because they begin to rely on the judgement of others. As an alternative, encouragement can be empowering. So instead of “Good job!” “Good girl,” or “You are so smart,” you can try, “You did it!” “Thank you for your help,” or “I can tell you worked really hard on this.”
How to help family members get on board
Model rather than preach!
Most family members won’t appreciate being given a list of rules about how to behave around your child. But you can provide a powerful example by modeling these approaches in front of your family.
Gentle reminders
Feel free to give family members gentle reminders, such as “Please don’t help him; he can do it himself” You can also make it clear what the child is capable of, such as “Lila likes to choose her own clothing. She can get dressed herself but she might need help if her arms get stuck. Please don’t worry if she puts things on the wrong way.”
Provide resources
If a family member seems receptive, you might share an article with a brief introduction to Montessori at Home, such as this one. For those who wish to know more, a nice introductory book is How to Raise an Amazing Kid the Montessori Way by Tim Seldin. Though not all of it will apply to extended family, it’s a quick read with lots of beautiful photos that provides a nice overview of Montessori for families. If you would like to help family members find child-size tools or suggest gifts that would be appreciated, you can give them a copy of the For Small Hands catalog or share a link to their website. You may also consider creating an Amazon wish list.
“The greatest gifts we can give our children are the roots of responsibility and the wings of independence.” -Dr. Maria Montessori
With a little help from family, we can create even more consistency between school and home and provide more opportunities for the child to build independence.
Stages of Language Development:
Step 1: Spoken Language: create an internal dictionary and practice using the words in it
Step 2: Phonemic Awareness: learn the sounds within words and the sounds/symbols of our alphabet
Step 3: Creating Words (Writing): learn to put those sounds/symbols together to make words
Step 4: Reading: Learn to decode those sounds/symbols to decipher words
Questions and Answers
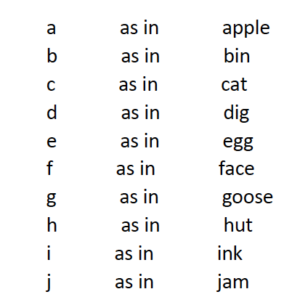
Why do you teach letter sounds rather than letter names?
What does a child need to learn to be able to write or read? That the letter “a” has a name, pronounced “aye,” or that it makes a sound, “æ” in the international phonetic alphabet, like in “apple” or “cat”? From a literacy perspective, the answer is clear: to write and read, children need to learn the sounds letters make, not their names. “Cee-aye-tee”, no matter how fast you say it, never blends together to make the sound “cat.” Yet most commercial products and educational television programs focus on teaching letter names. At best, they introduce sounds and names simultaneously, with emphasis on the name of the letters. In Montessori, in contrast, we start literacy by teaching sounds exclusively. (Download a list of Phonetic Letter Sounds here.) Because we don’t focus on letter names, the process is much less confusing for children, and it enables them to more quickly begin to write and read.
Why do you present only lowercase letters at first?
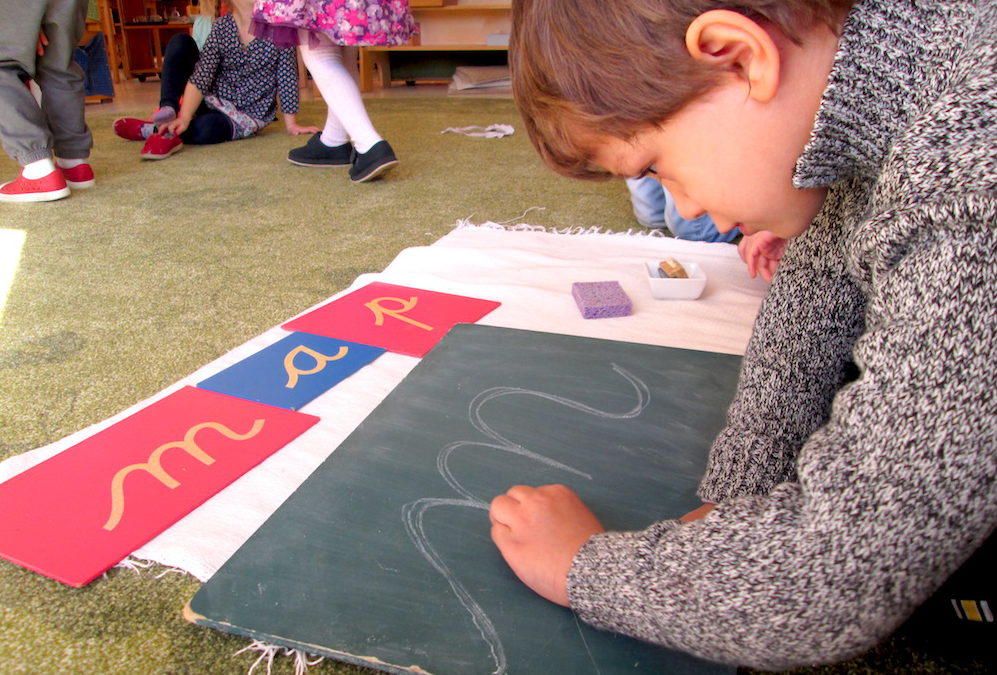
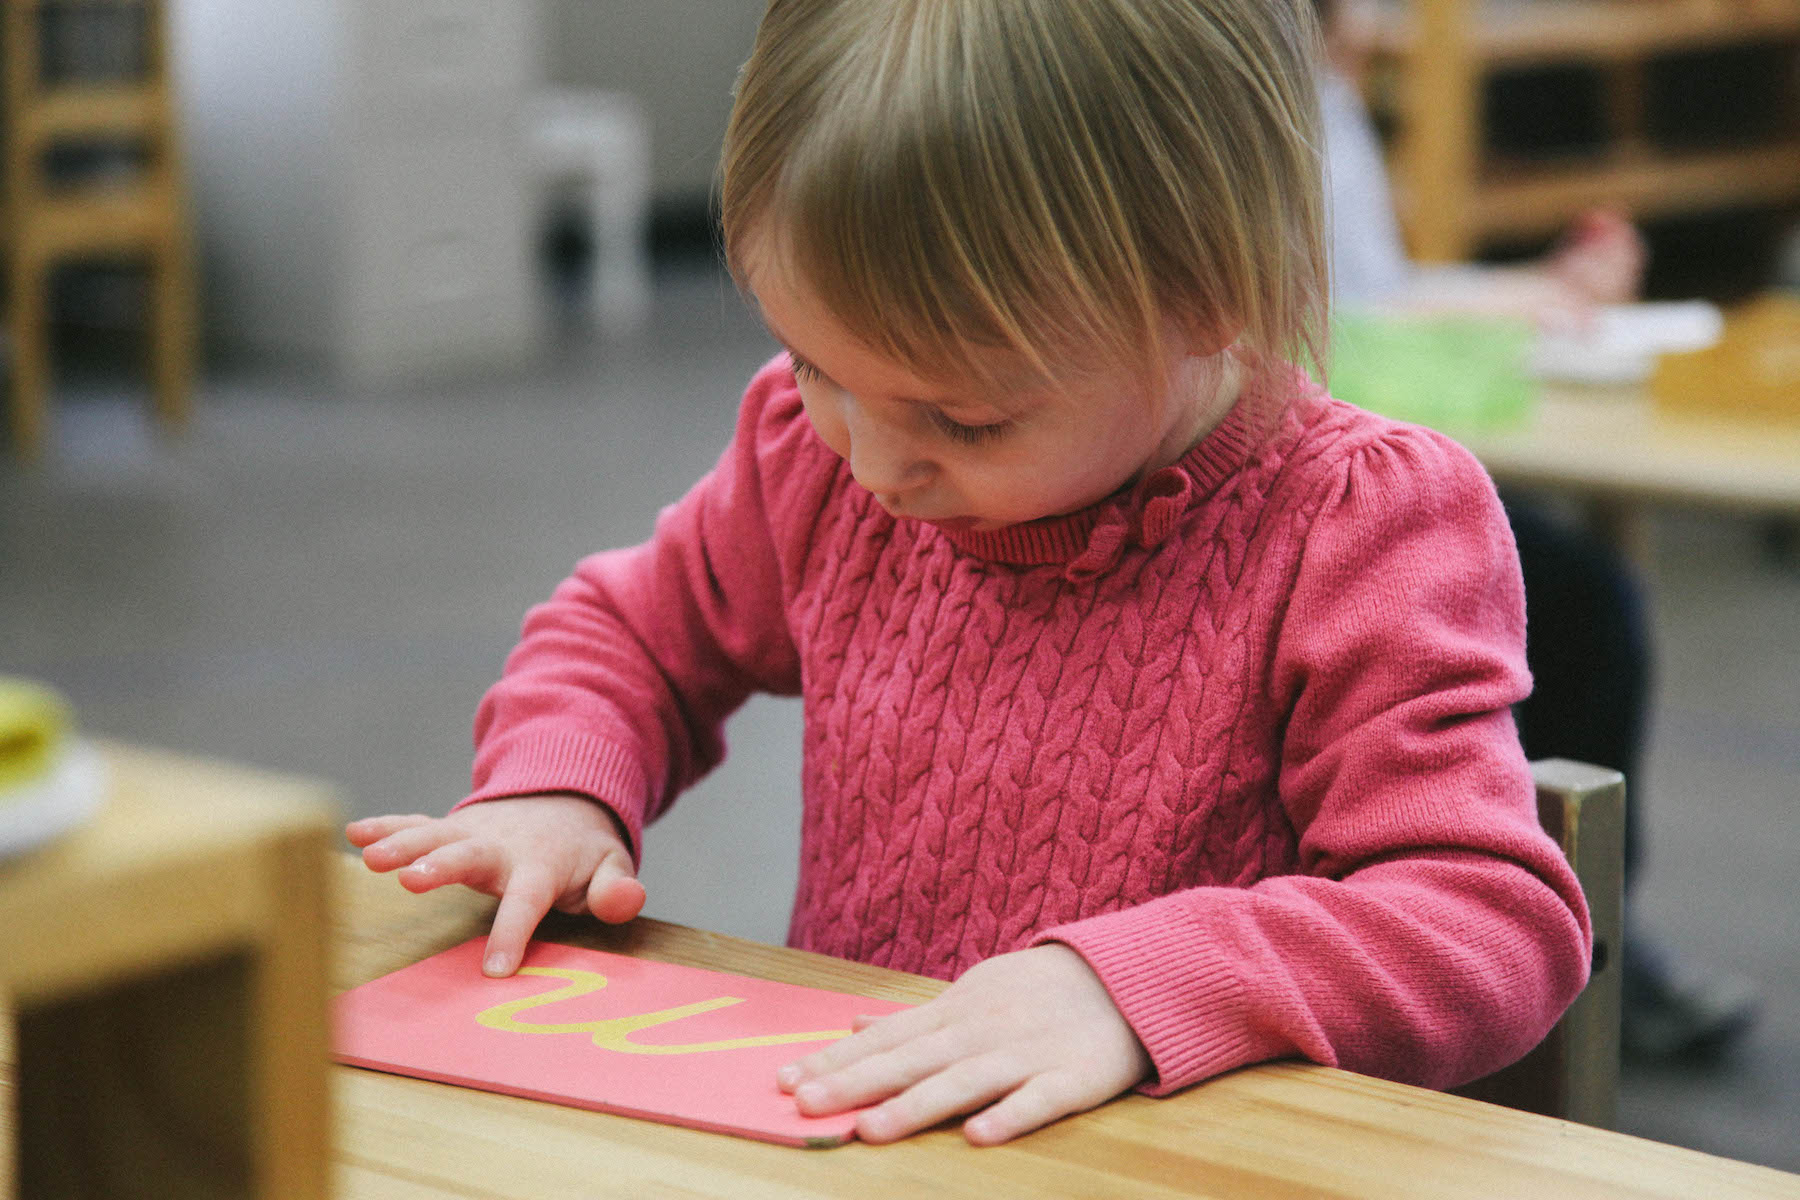
Most commercial materials and much public school instruction starts with capital print letters. This is contrary to what a child actually needs: 93% of what we read and write is written in lowercase letters, as is most of the writing they’ll do. That’s why in Montessori classrooms, we introduce lower-case letters first, and introduce capitals only later. Children in Montessori learn to associate letter sounds with letter shapes using a material called the Montessori Sandpaper Letters.


Children begin learning the letter sounds using sandpaper letters, which incorporate the sense of touch to further reinforce learning. They trace the letter with their fingers on a textured sandpaper inscription of the letter, learning the strokes used eventually to write that letter on paper.
Why do you present the letters out of (alphabetical) order?
When giving these lessons, Montessori guides present no more than three letter sounds at a time. There is no specified order of introduction, other than making sure that the letters don’t look and/or sound alike. One example of a presentation order is:
First set: c m a t
Second set: s r i p
Third set: b f o g
Fourth set: h j u l
Fifth set: d w e n
Sixth set: k q v x y z
Some Montessorians first introduce the first letter of the child’s name as a point of interest.
Why does writing precede reading?
The process and connection to writing will always precede that of reading. Cognitively, writing is just an analytical process that involves breaking down a word into its sounds. Reading is a more advanced mental process, requiring both analysis AND synthesis (putting the parts together).
Usually, children begins reading about six months after they start writing (composing words). Why? When you are writing, you are expressing your own thoughts. You are coupling sounds together to express your own intended meaning. Reading, on the other hand, involves putting sounds together and analyzing their meaning and order to comprehend an unknown meaning.
Why do you use hands-on materials to teach writing and reading?
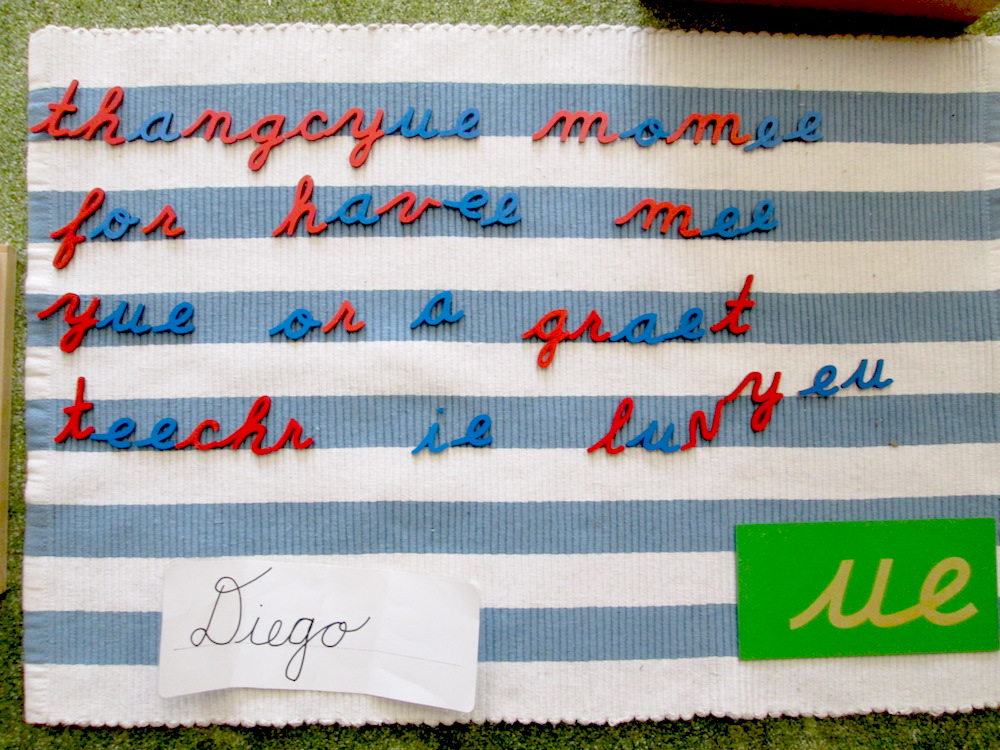
Separate handwriting from word-building. For a child to write a word, he needs to combine two separate skills: he needs to segment the word into sounds, represented by letters—and he needs to have the motor skills to write these letters on a piece of paper. Often, children can associate sounds with letters long before they can easily form the letters: their conceptual understanding of language is more advanced than their motor skills. That’s why in the Montessori program, children first “write” by building words with the Montessori Moveable Alphabet, a set of wooden letters that a child can arrange in different orders. They make words by placing the letters on a rug. This enables them to practice putting sounds together to make words—separated from the more challenging task of forming the letters with a pencil.


Children in Montessori classrooms also prepare the hand for writing with physical exercises, such as those found in our Practical Life and Sensorial areas. Children need to cut with scissors; they need to paint, to sew, to peel eggs, to wash tables; they need to build towers, hold puzzles by little knobs and carry big materials. These indirect preparatory materials strengthen shoulder, arm, wrist and finger muscles! The Montessori Metal Insets then help children joyfully master full pencil control: as they trace the inside and outside of the shapes, and color them in with careful, parallel lines, they have fun creating art and are imperceptibly and steadily improving their pencil control.
Why do you teach cursive first?
While cursive letters seem intimidating to most adults, they actually prove to be easier to learn than print letters: while writing in cursive, you don’t have to continuously lift the pencil off the page. This makes the act of writing fluid and continuous, without the extra stops and starts associated with print letters. In addition, letters that are easy to confuse in print are distinct in cursive, so children are less likely to reverse these letters.


Fascinating new research points out the benefits of cursive writing for cognitive development. A recent article in Psychology Today cited research which shows that:
- Students “wrote more words, faster, and expressed more ideas when writing essays by hand versus with a keyboard.” This study included second, fourth, and sixth graders.
- “Cursive writing helps train the brain to integrate visual (and) tactile information, and fine motor dexterity.”
- The regions of the brain that are activated during reading were “activated during handwriting, but not during typing.”
How can parents help at home?
You can help by:
- Articulating slowly and carefully
- Encouraging the children to speak and pronounce words
- Repeating new words
- Singing songs
- Reading books
- Reciting poetry
- Playing sound games like “I Spy” (see below)
- Please do not teach your child to memorize the names of the letters! Instead, emphasize the sound that each letter makes.
- Write in cursive when writing with your child
- Use lowercase letters when writing with your child
- Enjoy activities that build the muscles needed for writing (cutting, painting, etc.)
The “I Spy” Game
Here’s a great way to start on letter sounds, suitable for children of about 2 ½ years or older: Play a sound “I spy” game. Collect a few items with different beginning sounds (a fork, a cup, a napkin, for example). Place each item in your hand, and focus your child’s interest on the sound at the beginning of the word: “I spy something in my hand that starts with fffff: a f f f fork.” Once your child has mastered the sounds, you can advance to playing real “I spy”, asking them to look around and find items in their environment that start with the letter sound you mention. You can play this game at home, while on a walk, or in the car!

An important note: When making letter sounds with your child, be careful not to add the sound “uh” to the end. Letter sounds should be clipped to include only the consonant itself, such as “c” as in “cat” – and not “cuh.” You can download a list of Phonetic Letter Sounds here.
Greetings from Florida! For those of you who don’t know me, I was a Lower Elementary guide and then the Director of Admissions at Greenspring before moving to Florida. I have begun this series on Montessori in the Home to help parents find creative ways to implement Montessori practices into day-to-day activities at home. My daughter, Lila, is now three and a half and loves to work in the kitchen!
Getting Involved
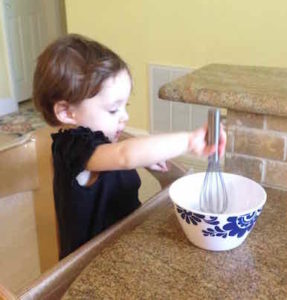
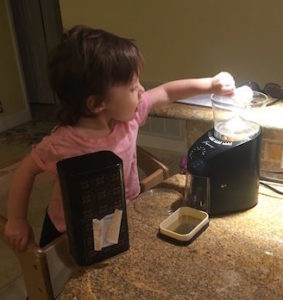
Lila has been an active participant in the kitchen since she was very small. Early activities included stirring batter, washing and scrubbing fruits and vegetables, peeling clementines and bananas, pouring coffee beans into the grinder, and dipping bread into eggs for french toast.

These activities help build the essential skills of coordination, concentration, order, and independence. The work also exposes the child to tasting new foods. Lila was always more interested in eating something that she helped to prepare.


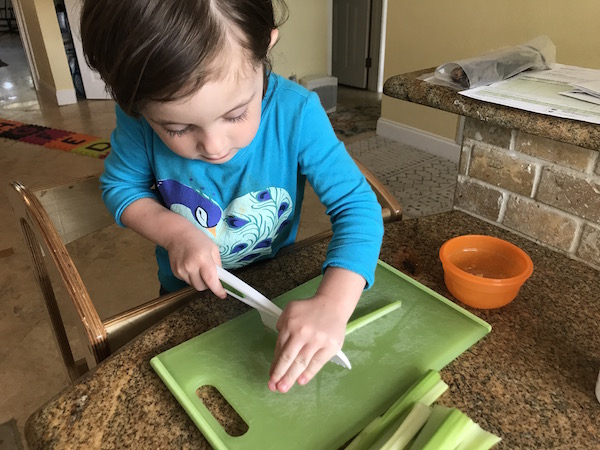
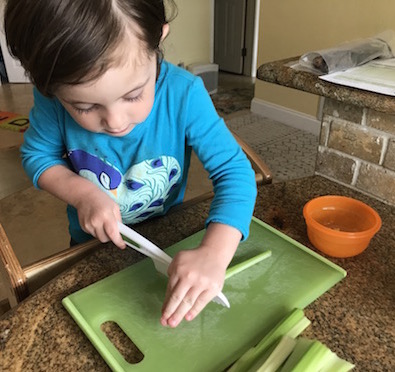
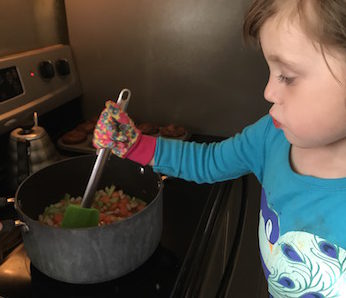
As her fine motor coordination increased, Lila started shucking corn, rolling dough, peeling and slicing eggs and bananas with special tools, and peeling carrots and cucumbers with a peeler and wavy chopper. Now Lila is also slicing vegetables with an acrylic knife, grating cheese, and juicing oranges. Child-size gardening gloves allow Lila to stir soup and flip pancakes without fear of touching the hot pan.


Involving a toddler at dinner time when everyone is tired can be challenging. If I have a few extra minutes earlier in the day, I will prepare part of the meal while Lila is still at school. This will allow me to focus more energy on her participation during the meal preparation. Sometimes I plan our joint projects for the weekends when I have more energy.

There are other ways besides cooking that children can help. Setting the table, sweeping up crumbs, and placing dirty dishes in the dishwasher are other ways that little ones can contribute. Montessorians know that children’s self-esteem comes from making meaningful contributions, rather than receiving compliments. So allowing children to be active participants in the family is a tremendous gift!
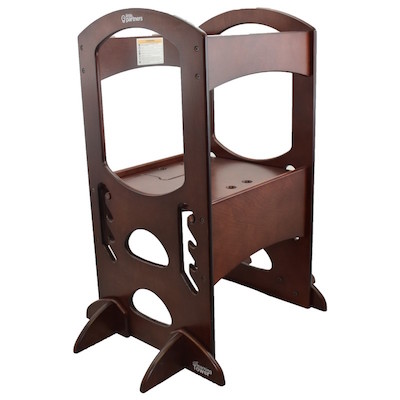
Learning Tower
The single most important tool you will need to allow your child to participate in the kitchen is a safe stool. We put the “Learning Tower” on our baby gift registry before Lila was born. Three and a half years later, we are still using it every day. When Lila was very small, we wrapped the sides with saran wrap so she couldn’t fall out. Soon she was able to climb in and out independently. The adjustable height allows the stool to grow with her. And you don’t need to worry about her falling off a regular stool.


I have seen some great “hacks” on the internet for converting an Ikea stool into a learning tower, for a much lower cost. If you’re handy, this is definitely worth a try!
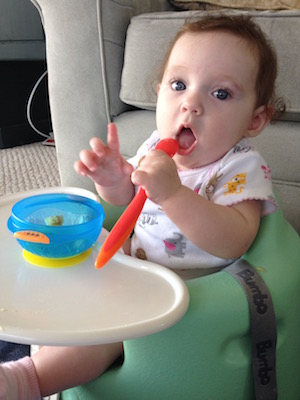
Eating Independently
As much as your child will enjoy helping prepare food, she will also be highly motivated to eat independently. When Lila was very small, she sat in a Bumbo or high chair. As soon as she was able to sit in a chair without falling off, we moved her to a toddler-size table and chair. (The table was bought from Ikea with the legs chopped to make it shorter.)


While she still sat in a high chair for family dinner at the dining table, all other meals and snacks were eaten at her special table. Soon, Lila began rejecting the high chair. That’s when we switched to a booster seat in a regular dining chair.
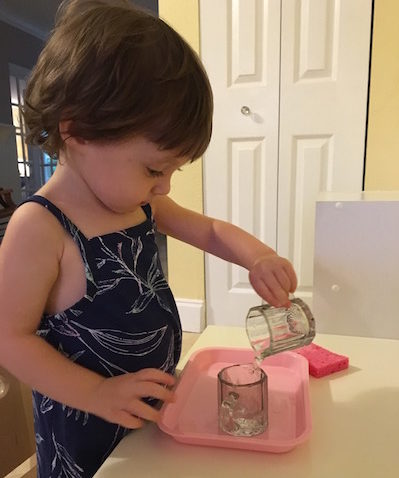
Montessori Services makes child-size glass dishes that are very sturdy. While I don’t like to replicate too many Montessori lessons in the home (as I like them to remain special at school and be presented by the experts!), I did invest in two small glass pitchers so that Lila could practice pouring. I have a full list of recommended supplies below.


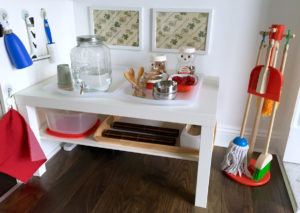
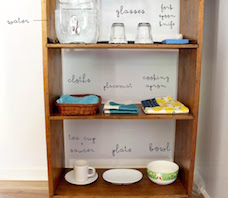
In order to further increase independence, you can make child-size dishes, utensils, kitchen tools, and cleaning supplies available at the child’s level. This can be a special shelf or just a lower kitchen cabinet that you dedicate for your child’s kitchen items.

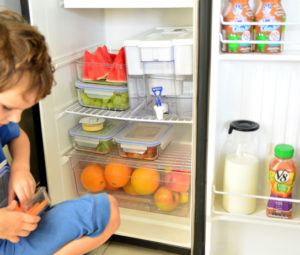

You might consider creating a water and snack station on a low shelf or table. By having water and healthy snacks available at all times, your child can help herself to food when she is hungry. You can also dedicate a low shelf of the refrigerator for your child’s use and keep liquids in smaller containers that are easy to pour.
Don’t feel like you need to tackle all of this at once. Try picking just one new system to implement in your home and see how it works!
I have also written about setting up a Montessori bedroom and a Montessori bathroom. Next I will tackle the play area! Questions, comments, suggestions? Email me at mjarrell@greenspringmontessori.org.
Resources:
There are many wonderful tools to help young children work safely in the kitchen.

Some of my favorite resources include:
Montessori Services (child-size tools)
How We Montessori (blog)
Some of my favorite products include:
- Learning tower or sturdy stool
- Child-size apron
- Wavy chopper
- Banana slicer
- Apple slicer
- Egg and mushroom slicer
- Citrus juicer/grater
- Nylon knife
- Peeler
- Non-skid cutting board
- Non-skid mixing bowl
- Spatula, mixing spoon, scrapers, whisk
- Child-size rolling pin
- Child-size oven mitts
- Child-size pitcher, glasses, plates, and utensils
- Spreaders
- Dishwashing station
- Non-toxic cleaning supplies

On any given day, you may smell an assortment of delicious aromas when you are walking the halls at Greenspring Montessori School. This is because students and faculty are often engaged in various cooking and baking activities as part of the Montessori curriculum. To support these efforts, we have a full kitchen in Emerson Village and we have kitchenettes complete with refrigerators, dishwashers, sinks, and prep space in each of the classrooms. Building practical life skills in areas of daily living is a cornerstone of the Montessori Method, and it is also proven to help students develop soft skills. These skills help children learn essential life tasks, such as working well with others, having empathy, and being trustworthy and respectful. To learn more about the importance of soft skills, please take a look at this new article.

Starting with our youngest students, guides and assistants work with toddlers to create snacks for their classroom. Whether they are carefully learning how to cut pieces of carrots using a crinkle cutter or making freshly squeezed orange juice, the children are actively involved in every step of the process. During the warmer months, many classrooms will also plant tomatoes, cucumbers, strawberries, and more in their outdoor environments, so they children will become familiar with where their food comes from.

At the Children’s House level, students will help to plan larger meals and snacks, and the guides introduce new flavors with the seasons. Instead of always baking comfort foods such as oatmeal cookies or muffins, our guides work to come up with recipes that include fresh and natural ingredients. During the fall, one of our Children’s House classrooms baked acorn squash. In addition to learning about how to use the oven with a classroom assistant, the children also talked about the color of the vegetable, the texture, and the new and interesting flavor!

Additionally, cooking is often a big part of Spanish language enrichment at all levels. Spanish Dual Language Children’s House students work with a parent volunteer each week to prepare mango salsa, pan de elote (a Mexican dish similar to cornbread pudding), and arroz rojo y friojoles de la olla (a Mexican style rice and beans). This is a great way to introduce new vocabulary and new tastes to our children while celebrating other cultures!

In Lower and Upper Elementary, students will often incorporate what they are learning in the classroom with a new recipe. Students in Ms. Sarah’s Spanish Dual Language classroom researched different cultures and shared meals with their entire classroom as part of their presentations. One group made yellow dal, a traditional Indian dish with lentils, while another group created Dulcis Coccora, an ancient Egyptian dessert (Cleopatra’s favorite!) made with honey.

At the Adolescent level, our students have come up with creative ways to grow their student-run business with their work in the kitchen! Several years ago, they started Pizza Fridays, selling pizza by the slice (along with hummus and veggies) every Friday to the students and the faculty. In addition to honing their cooking and prep skills, they also learn to work together, stay organized, and manage money. In addition, the students have built a chicken coop, compost bin, and they are starting a class garden. It is their hope to eventually sell eggs and vegetables to the school community, and even use some of these ingredients in their own cooking.
The joys of cooking with children can extend into your home too. Take a look at our blog on setting up your Montessori kitchen at home and consider trying some of the following this week:
- Take your child to the farmer’s market and pick out one new type of fruit or vegetable to try.
- Flip through a recipe book with your child and let them pick a meal for you to make together.
- Start giving your child a task during meal prep – this could be anything from rinsing the vegetables, to cutting, and eventually even cooking the ingredients.
- Give your child the opportunity to begin cooking, baking, or prepping one meal a day on their own (the younger ones may need some support) – this could be making scrambled eggs for breakfast, packing their own lunch, or preparing a snack when they get home from school.
- Make sure to include clean up in your routine together! – our children love setting the table with real plates and glassware, washing their dishes, and sweeping up crumbs
- Plant a garden – visit the store with your child and pick out seed packets or seedlings together! Children are more likely to try new things when they are involved in growing it themselves.


